
Account Settings: A Field-by-Field Guide
Learn what to include in your business profile and terms, how to set up the widget, where to enter API keys, and how to enable payments, pixels, and the consent banner.
Settings are organized into sections, with quick navigation to each in the left menu. Below, we explain what each field means and how it affects the agent's responses. There is a single “Save” button for the entire page, located at the top right.
Catalog Sources#
Website, Instagram, TikTok, YouTube, and Telegram channel. This section also shows when the last analysis was performed and how many posts were processed. For a detailed breakdown, see the article Connecting Sources.
About the Business#
Two fields the agent reviews at every turn of the conversation.
Profile. What you do, city, business hours, what you don't do, how to address customers. Example:
Loza Workshop weaves rattan baskets and furniture, Warsaw.
Open Mon–Sat 10–20, Sunday closed.
We deliver across Poland and the EU, pickup available from Mokotów.
We do not repair other people's furniture and do not work with wholesale orders under 20 items.
We address customers formally (using 'you'), no casual familiarity.
The 'what we don't do' line saves the most time: the agent will politely decline and offer what is available, instead of making promises you cannot keep.
Shop Terms. Delivery, payment, returns, warranty, appointments. This is the only source from which the agent answers questions about terms and conditions. Write in sections with headings, numbers, and deadlines. If something is not in this text, the agent will say they need to confirm with you and suggest leaving contact information.
Shop and Checkout#
| Field | Purpose |
|---|---|
| Website Address | Source for crawling and a fallback link for the “Go to Checkout” button |
| Website Platform | Hint on how to embed the widget; you can leave it as “Detect Automatically” |
| Cart Link | Where the checkout button leads if in-chat payment is disabled |
| Catalog Currency | Determined when crawling the site; needed for displaying prices and importing CSV without a currency column |
If you don't have a website, leave the address empty and enable in-chat payment — then the entire customer journey remains within the chat.
Keys and Models#
Anthropic Key (Claude). Both agents run on this key: the one that communicates with customers and the one that assists you. Get it from console.anthropic.com → Settings → API keys → Create key; it starts with sk-ant-api. A linked card is required for the account.
Google Gemini Key. Needed for video: speech, on-screen text, customer attachments. Get it from aistudio.google.com/api-keys; it starts with AIza and has a free limit.
The “Check and Save” button performs a test request, so you will immediately see an invalid key, rather than discovering it after a week of silence.
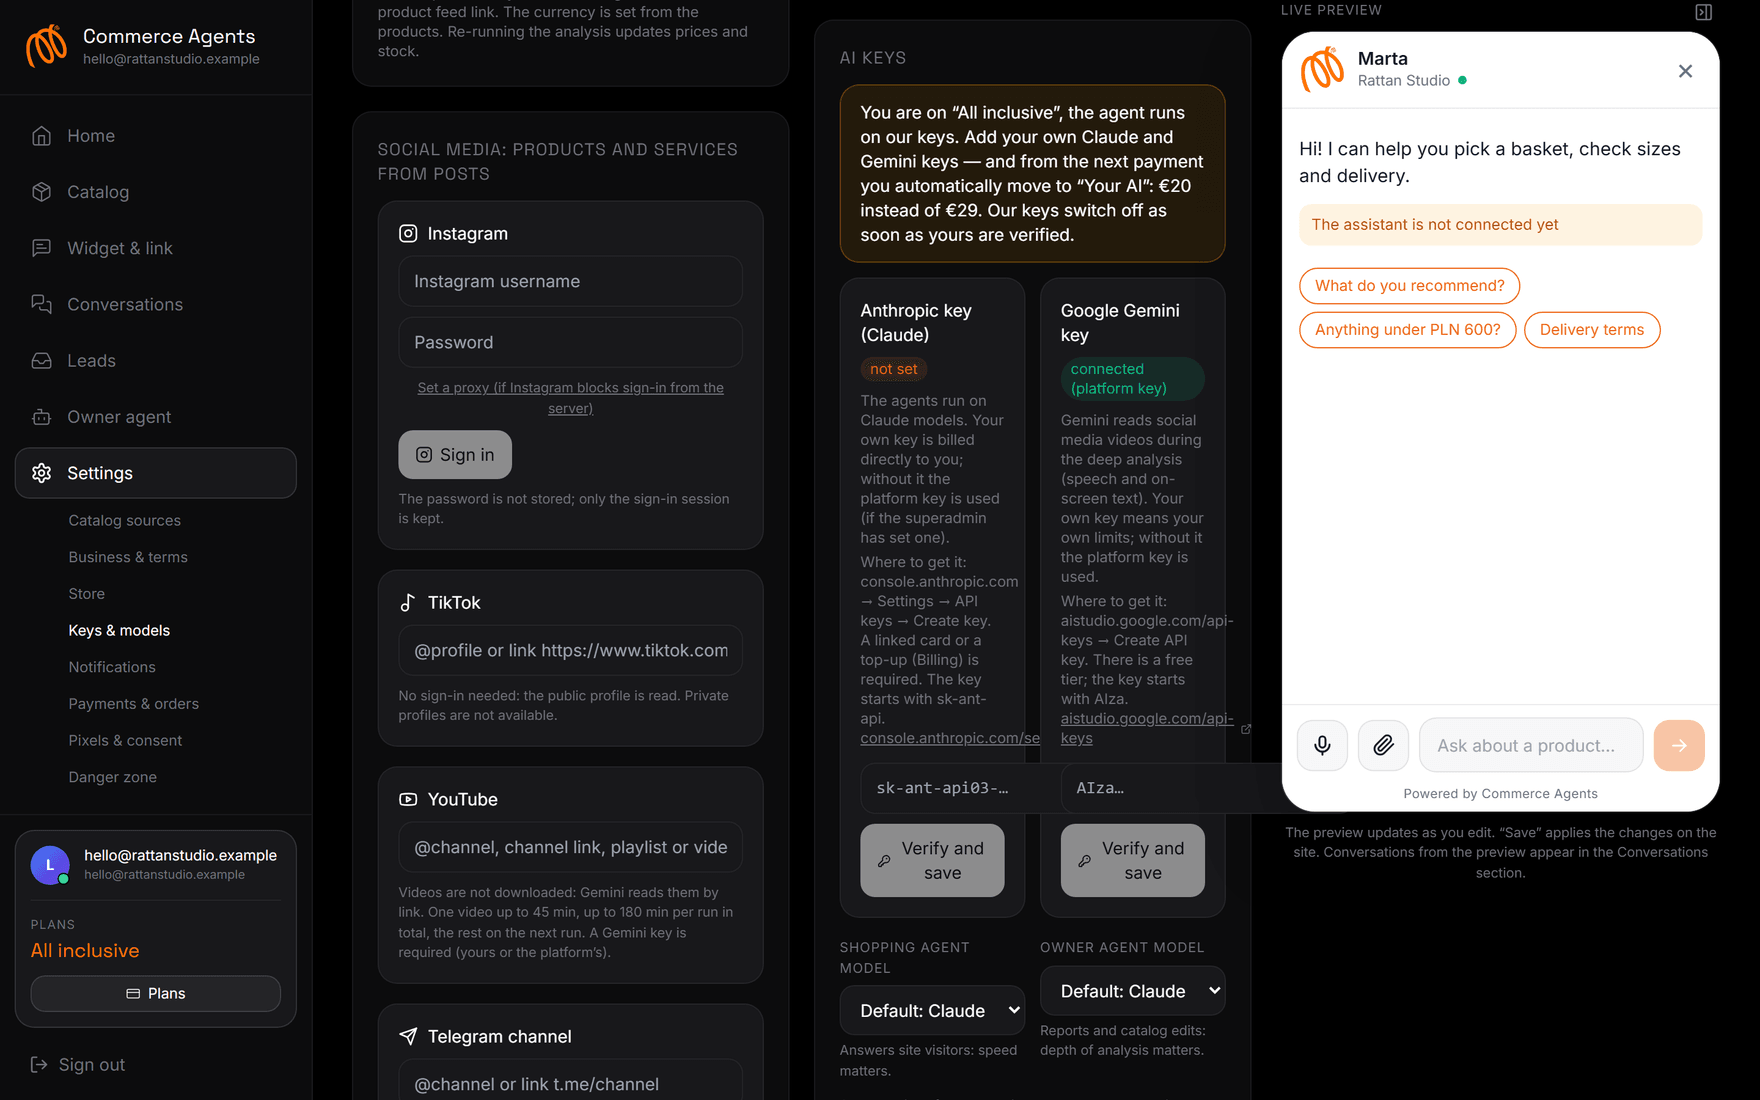
On the “All-Inclusive” plan, keys are not needed — the agent runs on ours. As soon as you save both of your keys, the service will automatically switch you to the “Your AI” plan for 20 € instead of 29 €. The new price will take effect with the next payment; access will not be interrupted.
Customer Agent Model — responds to visitors; speed is crucial here. Owner Agent Model — calculates reports and edits the catalog; depth is more important here. Sensible defaults are set; the list of models is populated based on your key.
Widget and Link#
A separate menu section, but essentially also settings — the agent's appearance.
- Shop Name and Assistant Name. The first appears in the chat header and link preview, the second is the interlocutor's signature.
- Greeting. The first phrase. A good greeting promises benefit: “I'll help you find your size and tell you about delivery”.
- Conversation Start Prompts. Up to four lines. If left empty, they will be generated from the catalog.
- What the Agent Should Know and Offer. Free text: phone number for urgent contact, who to forward wholesale inquiries to, appointment link. Also include promotions worth mentioning here.
- Tone of Communication. Choose from predefined options or create your own: “warm and concise”, “expert, formal”, “lively, with light humor”.
- Accent Color, Theme, Button Position. The “as visitor's” theme adapts to the system settings.
- Logo. This also becomes the app icon on the customer's phone.
- App Name on Phone. One word, up to 12 characters. If left empty, we will use the first word of the shop name.
- Microphone Button. Speech recognition in the customer's browser. If the browser does not support it, the customer will record a voice message, which Gemini will transcribe.
- Default Language. A fallback option: the agent still responds in the customer's language.
- Preview Title and Description, Cover Image. How the link appears in WhatsApp, Telegram, and Instagram. The cover image is automatically generated from your color, logo, and product photos, but you can upload your own.
Below are the code for your website (a single line before </body>), a link to the bot in the messenger, and the purchase pixel for the “Thank You for Your Order” page.
Notifications#
Telegram. The link button provides a bot link: message it, and the chat will connect. You will receive new inquiries, paid orders, hot leads, and a morning summary for yesterday.
Emails to Owner. Sent to the address you used to log in. The “Duplicate notifications to email” checkbox disables duplicates, “Daily morning summary” is the morning report. The “Email test” button checks delivery.
Payments and Orders#
This section is needed if you do not have a website with a shopping cart and want to accept payments directly in chat.
- Accept in-chat payments — the main toggle switch.
- Stripe. Secret key from Stripe Dashboard → Developers → API keys (
sk_live_…). A webhook for payment notifications is created automatically. Cards, Apple Pay, and Google Pay are supported. - Monobank. Acquiring token from web.monobank.ua → Acquiring → Token for API. Payments in Hryvnia.
- Telegram and WhatsApp for Orders. Used when payment is disabled: the customer leaves their name and phone number, clicks a button, and sends you an order with its contents, contact information, and a link to the dialogue.
The “Check” button pings the provider and shows if the key is active. After payment, you receive a message with the order details, contact information, and delivery address.
Pixels and Consent#
Each store has its own identifiers, which work on the bot's page via a link.
| Pixel | Where to find |
|---|---|
| Meta Pixel ID | Events Manager → Data sources → Pixel, 15–16 digits |
| TikTok Pixel ID | TikTok Ads Manager → Assets → Events → Web |
| Google tag ID | Analytics 4 (G-…) or Google Ads (AW-…) |
Page views, card opens, add-to-cart events, checkout starts, and leads are sent. The “Check” button confirms the format is correct and the script is delivered.
Consent Banner. Enable this if your customers are from the EU, UK, or California. Pixels do not load until “Accept” is clicked — this is exactly what GDPR requires. Next to it is a field for a link to your privacy policy: for the EU, it is mandatory and must state who the data operator is, what data is collected, why, how long it is stored, and how to withdraw consent.
The banner does not automatically make you compliant with the law. It covers the technical aspect: pixels do not fire without consent. The policy text is your responsibility.
Plan#
The plan card is located in the bottom left corner below your balance. Clicking it opens the “Plan” page: your current plan, next payment date, switching between “All-Inclusive” and “Your AI”, a promo code field, and subscription cancellation.
Cancellation involves two steps: first, we ask for the reason, then we offer to set up the agent for free. If the decision is final, the “Cancel Anyway” link is at the bottom. During the trial period, access is revoked immediately and no money is charged; on a paid plan, the agent works until the end of the paid period.
Danger Zone#
There is one button: “Delete all catalog items”. This cannot be undone, but settings and dialogues remain. This is useful when the catalog was compiled from incorrect sources and it's easier to start over.
Frequently Asked Questions#
What is most important to fill in first#
Store terms and conditions. Half of customer questions are about delivery, payment, and returns, and the agent answers them only with your text.
The agent invents things that are not true#
Check your profile and terms: most likely, they are empty or contain general statements. Add a line like “what we do not do” — it significantly disciplines the answers.
Can I change to my own keys later#
Yes, at any time. Save both keys, and your plan will automatically switch to “Your AI”. To switch back, use the button on the “Plan” page.
Are the website widget and link different agents#
They are the same. The catalog, terms, dialogues, and leads are shared; only the presentation differs: on the website, it's a window in the corner; via the link, it's a full-screen page that can be installed on a phone.
Where to see remaining limits#
On the main dashboard, in a line below the store name: posts and videos, video minutes, replies. Limits are monthly; during the trial period, they apply to the entire period.